Pages

Friday, October 30, 2009

Decking the walls...

I have been so busy this week that my art room has been put on the back burner. It is so annoying because I have no place to work. I'm seeing all these wonderful ideas in blogland and can't even try anything. Well I could spread everything out on the dining room table and work...that is until little man (my 5yr old) realizes that Mommy has her fun stuff out! OH BOY!!
Even though I've been busy, I've managed to take a few pictures of my baseboard installation. If any of you have ever tried to install baseboard, you know it can be very tricky getting the inside corners to match up without leaving a large gap especially if your walls aren't straight. I'd like to show you a little technique to help alleviate gaps in your trim.
Start in the corner of the room and place the straight edge of the baseboard against the corner wall. Don't forget to mitter the opposite end of the trim (see picture at the bottom of this post). I'll explain why in a moment.
So once you have this corner piece installed, you are going to mitter the joining piece of trim that will be installed on the opposite wall. When you mitter the end make sure to cut the 45 degree angle to where the inside of the trim is exposed (see above picture).
Next you will be using a coping saw to remove the exposed wood edge. Be careful and trim the exposed wood making sure to stay on the outside edge of the trim face. If you look close, you can see that the outside edge of my trim is white. By the way...I'm right handed and its very difficult to pretend I'm cutting a piece of wood with my left hand...while my right hand is attempting to take a picture!!! Hubby was simply looking at me mumbling "you're not right!!" A little help here!!! :)
I know your probably scratching your head right now wondering why I just went through all that trouble cutting off that little chunk of wood...Well this is why....
Isn't it SWEET!!! A perfectly matched corner with little gap. This makes caulking much easier!!
Earlier in this post I had said not forget to mitter the opposite end of the trim. The reasons for this little step:
#1: it helps to disguise the seam when two pieces of trim are matched up and
#2: because it allows for movement due to settling. Have you ever seen a house where someone had placed two straight cut trim pieces up together and there was a huge gap between them? Yap I think we've all seen that at one point. Mittering helps give the trim a way to move without creating a large noticeable gap.
Well I hope this helped. I know I didn't use all the professional terminology...but hey I showed you the technique. Hope everyone has a great weekend.
Talk to ya soon!

Tuesday, October 27, 2009

Sweet Halloween Ideas!!

I found these cute Halloween receipts this morning and thought I'd share some of them. Enjoy!!


Frankenstein Brownies

1 box Betty Crocker® Original Supreme brownie mix (with chocolate syrup pouch)
Water, vegetable oil and eggs called for on brownie mix box
1 container (1 lb) Betty Crocker® Rich & Creamy vanilla frosting
3 drops neon green food color
3 drops neon purple food color
36 candy corn
36 miniature candy-coated chocolate baking bits
Betty Crocker® black decorating gel (from 0.68-oz tube)

1.Heat oven to 350°F. Make and bake brownies in 13x9-inch pan as directed on box, using water, oil and eggs. Cool completely, about 2 hours. Cut into 6 rows by 3 rows to make 18 brownies.
2.Divide frosting between 2 small bowls. Add green food color 1 bowl and purple food color to second bowl; mix both until blended. Frost 12 brownies with about 1 tablespoon green frosting; frost remaining brownies with purple frosting.
3.Decorate each brownie with 2 candy corns for neck "bolts" and 2 candy-coated baking bits for eyes. Use decorating gel to add pupils to eyes and draw mouth and hair.


Peanut Butter Spider Cookies

1 pouch Betty Crocker® peanut butter cookie mix
3 tablespoons vegetable oil
1 tablespoon water
1 egg
36 chewy caramels in milk chocolate
Black or red string licorice
1/3 cup (72) miniature candy-coated chocolate baking bits
Betty Crocker® black decorating gel (from 0.68-oz tube)

1. Heat oven to 375°F. In medium bowl, stir cookie mix, oil, water and egg until dough forms.
2. Shape dough into 36 (1-inch) balls. On ungreased cookie sheets, place 2 inches apart.
3. Bake 8 to 10 minutes or until light golden brown. Immediately press 1 chewy caramel in center of each cookie. Cool 2 minutes; remove from cookie sheets to cooling racks.
4. Cut licorice into 8 (2-inch) pieces for each spider. Attach legs by sticking into chewy caramel. Use baking bits for eyes and black gel to make pupils in eyes.
Candy Corn Cookies

1 pouch (1 lb 1.5 oz) Betty Crocker® sugar cookie mix
1/3 cup butter or margarine, melted
1 egg
Orange paste food color
2 oz semisweet chocolate, melted, cooled

1. Line 8x4-inch loaf pan with waxed paper, extending paper over sides of pan. In medium bowl, stir cookie mix, butter and egg until soft dough forms.
2. On work surface, place 3/4 cup dough. Knead desired amount of food color into dough until color is uniform. Press dough evenly in bottom of pan.
3. Divide remaining dough in half. Gently press one half of remaining dough into pan on top of orange dough. On work surface, knead chocolate into remaining dough until color is uniform. Press over plain dough in pan, pressing gently to edge of pan. Refrigerate 1 1/2 to 2 hours or until firm.
4. Heat oven to 375°F. Remove dough from pan. Cut crosswise into 1/4-inch-thick slices. Cut each slice into 5 wedges. On ungreased cookie sheet, place wedges 1 inch apart.
5. Bake 7 to 9 minutes or until cookies are set and edges are very light golden brown. Cool 1 minute; remove from cookie sheet. Cool completely. Store in tightly covered container.
If you would like to see more great Halloween receipt ideas head on over HERE to Miss Betty's.


Talk to ya soon!


Monday, October 26, 2009

Easy Peasy Little Girls Mural

We painted our baby girls room in a medium violet color. Sorry I can't remember the color name off hand...I know its by Valspar! Anyway...I wanted to paint a cute mural above her crib. Me being so indecisive as I am, I decided to do a cute and quick version. A mural that wouldn't take me long to paint but was easy to remove when I change my mind.

I used the crib as a guide. I used a pencil and made a small mark where I wanted the bottom of the mural to be (about eight inches above the top of the crib). Next I painted a large freehand oval with some left over Valspar sample paint. It doesn't matter if the oval is not perfect. You will be adding foliage around the outside that will cover up any imperfections.

I used a two colors of green (lime and forest) and a sunshine yellow to paint the foliage. Starting at the bottom, I worked my way around the oval with strokes of green with yellow highlights. After I was satisfied with my foliage, I applied these sticky back decals to the mural. "Sticky back"...can ya tell I live with a five year old!!! I digress...these decals were purchased at Walmart for $10.

I applied the flowers in such a way that it looked like they were growing out of the painted foliage. I placed the little bird and the butterfly on a blade of grass. The fairies were applied last. Once everything was in place, I noticed that the fairies had glitter on their wings. So I grabbed some Tee shirt glitter paint and brushed it on the background. Hey every fairy need pixie dust!!!

I was please with how it turned out and my daughter loves to look up at it when she's in her crib. It was easy to do and will be easy to change! I like those kind of projects!!

I'm linking up with Met Mondays at BNOTP.

Talk to ya soon!

Friday, October 23, 2009

What a gloomy blah day! Ya ever have those days that ya wish ya could go back to bed? Well that's me today. Hubby was up all last night with the stomach flu and the baby thought it would be cute to wake up and babble for 2 hours. Oh she was very precious babbling away...little stinker!! Those late nights make for long days.

I'm hoping to complete my craft/art studio this weekend so I can share it with you all. All I lack is the trim work and Sheetrock/paint touch ups. I'll try to take lots of pictures of the trim installation...keep ya posted! Well I hope everyone has a blessed weekend.

Talk to ya soon!

Wednesday, October 21, 2009

Granite countertops

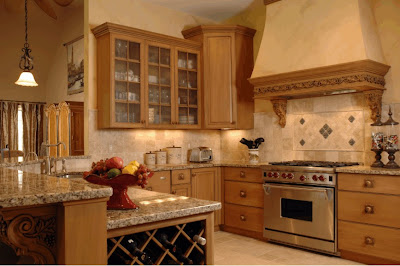
Who doesn't love granite countertops? They give your kitchen a refined, upper end look as well as increasing the value of your home. Who could go wrong installing granite in their kitchen...that is until you go into convulsions looking at the price per a square foot! It's really unbelievable that a slab of granite sales anywhere from $39.00 sq ft to $100.00 sq ft. (supply and demand at its finest people). Now if I had some extra cash, I might could talk myself into $39-$49 a sq ft....but $100 sq ft....don't think so! Pigs would be flying over my house first!

After some Internet research, I found a less expensive option to solid granite slab countertops...granite tiles. You get the same look but for less and hey isn't that what we're all working towards? Take a look at the below picture. You can barely tell its tile. (Look closely to the left side of the picture). Using minimal to no grout lines and a grout that blends with the granite, one can hardly tell the countertops are not solid granite.
(Photo taken from www.easygranitetiles.com)
To see how to's on installing granite tile countertops:

DIY Network's Amy Mathews tutorial on installing granite tile CLICK HERE

OR


The Family Handyman's tutorial CLICK HERE


Hope this give you some new project ideas...I know its got me to thinking!

Have a great week!! Talk to ya soon!

Saturday, October 17, 2009

Cool Finds...

Hello...hope everyone is having a great weekend. My little man and I braved the wet, cold weather to go junking today. We stopped at several places and this is what we found.

I just adore this tray. It has ornate handles and little feet! I placed it in my kitchen with a little fall vignette on it...lovvvve it!!


By the way isn't that electrical outlet in my picture just divine!! It seems that my back splash has an outlet Oh every 16 inches or so! NICE HUH?

The second little pretty I picked up was this cool old screen door. Sorry I had to use the flash on this picture...it was very gloomy outside. I haven't decided what to do with it yet. If I only had a walk in pantry!! Hummmmmmm!
Well that's it for me today. Talk to ya soon!!


Thursday, October 15, 2009

Halloween Tree with Ornaments

This morning I told my son that we would get out our fake jack-o-lantern Old Snaggle Tooth and put him on display in our window. I normally don't decorate very much for Halloween maybe a few hand carved jack-0-lanterns and of course Old Snaggle Tooth.

My son was so excited about putting Old Snaggle Tooth out that I decided to see if I could find a cute and easy Halloween craft he could make. I found this easy idea on Better Homes and Gardens.com.

A Spooky Halloween Tree with Ornaments!!
You just can't beat a project like this...majority of the items are things you already have around the house. Maybe I'll have a scavenger hunt and let the kiddos find all the supplies.
If you would like directions on how to make this, click HERE
Hope you have a great day!
Talk to ya soon!

Tuesday, October 13, 2009

Tea for 2-1/2


A two weeks ago my dear sweet grandmother took my 4 month old daughter and myself to a quaint tea room to celebrate my birthday. We absolutely loved it! It was such a blessing to share that special time with both my grandmother and my daughter. It was so nice to get away from the craziness of everyday life and just reconnect.

There were beautiful damask table linens draped on each table. The china and silverware were of mixed patterns and textures, giving a homey welcoming feel. The fine china tea pot sat on a brass warmer (warmed by a small tea candle).

The sweet smell of hot tea wafted through the air. The homemade breads and scones were heavenly. A small dual condiment dish was brought out with Mock Devonshire Cream and Lemon Curd...Yum Yum! If you ever find yourself in the North Georgia Mountains, you must go by and have a spot of tea at the Baron York Cafe.


As I was enjoying my tea and scones, I had a thought...why don't I figure out a way of displaying my various tea cups and saucers. So off to the net I went and this is what I found...

Wall Display Racks and Table Display Racks:


$29.95 $23.95


These can be purchased at The Tea Cup Gallery


If you had several prized teacups and saucers, display racks like the ones above would be perfect but what if you had a whooooole lot of them? I personally like this...


Better Homes and Gardens


Oh yeah...I finally found out how to take that yellow date stamp off my pictures! So hopefully from now on my pics won't have dates on them...that is if I don't forget!!

Thanks for stopping by...Talk to ya soon!


Sunday, October 11, 2009

New Trash...I smell a project PART 2

Today I'm linking up to Met Monday @ BNOTP


A week ago I wrote a post about these beauties that my hubby had rescued from the garbage. My plan for them included some paint, scrapbook paper, Modge Podge and a Lazy Susan. My idea was to make a much needed craft storage container for my soon to be completed art room/office.


I began by painting the tubes black on the inside and white on the outside. I allowed them to dry overnight. I was out of spray paint so I just used some left over craft paint.

Next I applied the fabric to the outside of the tubes. I had to settle for fabric because none of the hobby stores I visited had the scrapbook paper I wanted. So I found these cute b&w patterened fabrics and decided to use them instead.

After gluing myself to the table (or so it seemed), I figured out the best way to decopage the fabric to the tubes. I started with a 2" swipe of Modge Podge all the way down the length of the tube. I then placed the fabric on the swipe of glue and pressed out all the bubbles/folds. I continued to do this until the fabric completely covered the tube. If you do decide to use fabric instead of paper, you can get clean edge by pressing a 1/4" fold in the top and bottom of the fabric (this is edges of the fabric that will be exposed at the top and bottom of the tube).

Once my tubes were covered with fabric, I painted each tube with a generous coating of Modge Podge to seal the fabric. This is optional but I found it gives the fabric more duralibity.

When the tubes were throughly dry (about 4-5 hours), I glued them down to my Lazy Susan and tied a b&w polka dot ribbon around them for decoration.


This is what I ended up with.....


I can't wait to try it out!!


Talk to ya soon!!


Thursday, October 8, 2009

Trying New Things...

Last night my kiddos and I decided to do a little fall baking. They love to get in the kitchen and "experiment" as they say.

I had found this receipt in a Betty Crocker calendar and decided that it would be perfect for a fall family night. The only thing I didn't have was whipped cream!!

Caramel Apple Dessert
1 1/2 cups Original Bisquick mix
2/3 cup granulated sugar
1/2 cup milk
2 medium cooking apples, peeled, sliced (2 cups)
1 tablespoon lemon juice
3/4 cup packed brown sugar
1/2 teaspoon ground cinnamon
1 cup boiling water
Sweetened whipped cream or ice cream, if desired
1. Heat oven to 350F. In medium bowl, mix Bisquick mix and granulated sugar. Stir in milk until blended. Pour into ungreased 9-inch square pan.
2. Top with apples; sprinkle with lemon juice. Mix brown sugar and cinnamon; sprinkle over apples. Pour boiling water over apples.
3. Bake 50 to 60 minutes or until toothpick inserts in center comes out clean. Serve warm with whipped cream.
All in all it came out pretty well. My biggest challenge was keeping my 5yr old from eating all of my fresh cut apples.
However, I think if we make it again I will reverse steps one and two. I would place the apples, cinnamon, sugar, lemon juice and water on the bottom of the pan. Then I would pour the Bisquick mixture on top. Maybe 3/4 of the way through baking, brush the top with a melted butter/sugar/cinnamon mixture to give a nice golden crunch to the top.
Talk to ya soon!!

Wednesday, October 7, 2009

New Trash...I smell a project!!


Just feast your eyes on these babies!! Hubby found them at work. Apparently they were used as packing material and instead of tossing them he brought them home.

Initially he had intended these to be for our 5yr old (for building toy bridges and racing cars through them, etc.). However, Mommy got'em first!! Don't think bad of me...Hubby had already brought like 10 of them home for the kiddo. So everyone is covered! ha ha

OK back to these lovely little things. What are they you might ask? These are chip board packing tubes (very heavy condensed cardboard tubes) and are about 1/4" thick...so not your average paper towel tube.

I have the most wonderful idea. It involves black paint, scrapbooking paper, Mod Podge and a cheapo lazy Susan. Give me a few days and I'll reveal their transformation!!

P.S. Doofus here forgot to turn the date function off...AGAIN!!

Talk to ya soon!

Monday, October 5, 2009

Wish'in and Hope'in and Dream'in

It's a cold rainy day and I'm stuck at work...with a little time on my hands. So what's a girl to do? Why day dream a little!!!


Better Homes and Gardens
This settee is casual but elegant. I love the fact that it is a bench but yet the
pillows give it a soft cushiony feel. (Cushiony is a funny little word isn't it? hee-hee)
I think I would like to try and make this little pretty!

Better Homes and Gardens
My living room would look great with raised panels. I have a vaulted ceiling and I think the white panel would help break up the height. I would have to find wood strips that were 1/4" thick. That way we wouldn't have to remove my baseboard (which I really like).


Better Homes and Gardens
Oh I could so see this on one of the tall walls in my living room. Some nice built in shelving with bead board behind it. We could make a nice little nook for the sofa to sit in!!....HUM!! OH Sweet HUBBY!!!


Better Homes and Gardens
I just love the sweet scallop design of this display shelf. Wonder how they did that?? Maybe a band saw. I would have to work up to using one of those...Don't think I want to loose a finger just yet!!! LOL


houzz.com
I have actually been trying to talk Hubby into installing pine wood floors in the kitchen so I can paint them black and white. He likes the idea...but he kinda looks at me like I've lost my mind! Oh well, guess I'll have to talk him into it. I've just about got him talked into the bead board back splash...maybe mixing in some tin as well.


houzz.com
Just about everywhere I turn, I see people using old screen doors as pantry doors like Layla at The Lettered Cottage and Aunt Ruthie at Sugar Pie Farm House. My house lacks a walk in pantry or a closet pantry for that matter. So I thought it would be nifty to hang an old screen door in my dining room entryway. It would give some separation between kitchen and dining room...but still have that open feeling.

OH Boy...back to work! Thanks for coming along with me while I day dreamed.

Talk to ya soon.